Pages
▼
Monday, October 31, 2011
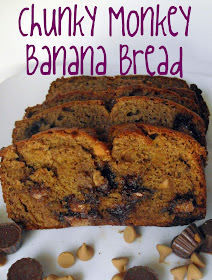
Chunky Monkey Banana Bread
This bread started off really healthy. I mean whole wheat flour, applesauce, bananas. A diet friendly sort of thing.
Then these guys crashed the party.
I couldn't turn them away. Look at those faces. I had to make them feel included and wanted. It was the right thing to do.
From then on, things got even crazier when I remembered the peanut butter chips in the pantry.
Oh well, maybe the healthy ingredients will cancel out all the naughty calories from the party crashers.
Regardless, this is an awesome bread. It will make banana bread haters change their way of thinking. It is wholesomely rich without being too sweet. And not too banana-y.
Here's the recipe:
Chunky Monkey Banana Bread
adapted from Cookies and Cups
3 ripe bananas
1/2 cup peanut butter
1/4 cup applesauce
1/4 cup egg substitute
1/2 cup sugar
1/4 cup brown sugar
1 1/2 cups whole wheat flour
1/2 tsp baking soda
1 1/2 tsp baking powder
1/2 tsp salt
8 oz. bag of mini Reeses PB cups
1/2 cup peanut butter chips
Whisk together all dry ingredients. Throw in the mashed banana, applesauce and egg and stir to combine.
Stir in the peanut butter, Reeses and PB chips.
Bake at 350 degrees for 1 hour.
Make this bread. If anyone at the office asks what you had for breakfast all you need to say is whole wheat banana bread. It's not a lie. You are just omitting a few details.
No biggie.
By the way, you probably want to let your bread cool before slicing, or this could happen to you:
Oh, yeah.
Happy Halloween, ya'll!
me and my pumpkin
Friday, October 28, 2011
Fabulous Fall Fridays: Potato Soup
I love soup. I basically live on soup in the colder months. Well, that's not true. I don't eat soup for breakfast. Or dessert. But lunch and dinner are all about soups.
This potato soup is super vegified making it healthy and filling. I was going to say that this was a vegan dish, but I used chicken broth, so it's not. If you want to make it vegan, use vegetable broth.
Here's how easy this was:
Renee's Potato Soup
4 medium sized yellow potatoes
1/2 smallish bag of baby carrots
1 head of broccoli
1 box of chicken broth
garlic
salt + pepper
olive oil
*celery would be good in this, but I did not have any
Reserve one potato and cut up your other veggies. I cut up the carrots first. I cooked the extra potato in plastic in the microwave until done (about 4 minutes), then pureed it with a little broth in my food processor to add a thickness to the soup without using flour.
Get your pot hot and throw in some oil to coat the bottom. Then toss in your chopped carrots and let them cook while you chop your other vegetables. Put the potatoes in as you cut them. Once the potatoes and carrots are in, season them with garlic, salt and pepper and put a lid on the pot and let them cook for about 10 minutes (that seemed like a run on sentence-oh well). Add the broth and the chopped broccoli and bring to a boil. Simmer until the veggies are tender, and stir in your pureed potato to thicken.
This soup is great with some cheese and bacon on top and a side of crusty bread.
So colorful!
Wednesday, October 26, 2011
Gift Idea Wednesdays: Chalkboard Mug
I really love chalkboard paint. Now that I have it in spray paint form I kind of want to spray everything in the house and make it a chalkboard. This can't be normal.
So to focus my chalkboard spray paint trigger happy self, I am presenting a new gift idea with only 59 days until Christmas!
This is a really easy gift to throw together, and you could totally make several at once. Remember to tell the person that you gift it to that it is hand wash only!
I used a mug that I already had, chalkboard spray paint and painter's tape.
I got out my trusty spray paint box.
So, basically tape off the mug, spray it, let it dry before peeling off the tape and you are done!
I made a quick mug rug to include in the gift, but did not do a tutorial for it. It is basically a hot pad for your mug. It is just rectangles of fabric with a piece of fleece in the middle. If you want to make one, here is a good tutorial: The Split Stitch
Anyways, the chalkboard mug could be for anyone of any age.
You can write notes to a special someone:
Reminders for yourself:
Or bring out your artistic side:
Make it for someone awesome and spread the joy of chalk.
**As you can see, my paint line is not perfect where I peeled off the tape. Remember that nail polish remover and a q-tip will alleviate this. So pretend I did that and it looks flawless, okay?
Tuesday, October 25, 2011
Single Serving Fudge Cake With Peanut Butter Frosting
I eat dessert every day. I usually have some froyo in a cone, but I ran out. So, I was experimenting with a single serve dessert.
I'm sure you all remember my four cookie recipe.
This is kind of like that, except it is for one person. Seriously, if you know someone else is going to be mooching your dessert, don't make this. Or double the recipe. This is the kind of dessert that encourages selfishness.
Although this fudgy cake is decadent and topped with peanut butter frosting it is super diet friendly. There is a secret ingredient. It's pumpkin. Oh. Not so secret anymore. Well, don't worry. This dessert is straightforward chocolate and peanut butter. No pumpkin taste to be found.
Agh! It's so yummy! Ok, I better tell you how to make this so you can get to it.
Single Fudge Cake
3 tbsp devil's food cake mix
2 tbsp canned pumpkin puree
1 1/2 tbsp lite milk (I used almond milk)
*optional-splash of vanilla OR sprinkle of cinnamon (I used cinnamon)
Preheat the oven to 350 degrees and spray a ramekin or single muffin tin vessel with non-stick spray. Mix all your ingredients and then pour them in your ramekin or muffin tin. Bake for 20 minutes (maybe less if in a muffin tin).
While that is cooking, prepare your frosting.
Peanut Butter Frosting
3 tbsp powdered sugar
1 tbsp reduced fat peanut butter (I used Skippy super chunk)
1 tbsp pumpkin puree
Mix this up then pop in the freezer for about 5 minutes or so.
Optional garnishes: sprinkles and sugar free chocolate syrup
You must try this, because I'm not sharing any of mine!
Monday, October 24, 2011
Halloween Candy Bark
I guess I'm in the spirit of Halloween now. My nephew and I decided to make some candy bark.
Or I decided to and he decided to munch on all the fixings, including the melty chocolate bowl.
Well, it came together pretty easily.
Here's what we used:
White chocolate chips
Milk chocolate chips
Vegetable oil (not pictured)
Halloween cookies (wanted the orange Oreos, but they were out at the store)
Pretzels
Candy corn
Candy corn M+Ms
Orange and black sprinkles
Lay some wax paper on a cookie sheet and have your helper sprinkle a little of each kind of candy, cookie, pretzel and sprinkle all over the wax paper.
Melt some chocolate chips in the microwave with a touch of oil (maybe 1-2 tsp) for 30 seconds at a time, stirring after each interval, until melty.
Pour the chocolate on the candy mix on the wax paper. Then repeat with the white chocolate and drag a spoon around to sort of swirl it.
Pop the tray in the freezer for about 20-30 minutes for the chocolate to set.
Break up pieces with your hands and enjoy.
I personally found this to be too sweet, but we packaged most of it up to share with family and friends. Everyone else seemed to like it. I was probably burned out on all the sugar I ate while making these!
While the chocolate is setting, here is another fun pumpkin painting project to do.
We taped the face on one side by putting a rectangle for eyes, nose and mouth and then drawing what we wanted with a pen. Next I carefully cut the tape around our drawn design with my X-acto knife and peeled off the extra.
My 5 year old nephew wrote his and his newborn brother's name on the opposite side and I cut out the letter shapes with the tape.
Then we painted the pumpkin with acrylic paint and removed the tape.
This pumpkin project was inspired by Young House Love.
Saturday, October 22, 2011
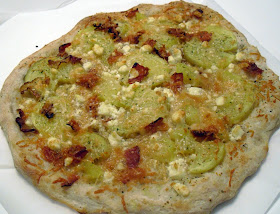
Potato Pizza
I was in the mood for a veggie pizza, but we had no veggies suitable for a pizza. I scoured the pantry and came up with potatoes and thought, "Why not?"
I wouldn't normally post something so haphazardly thrown together, but this turned out so good, I had to share it.
The crust is thin and crispy, but not too thin and crispy and the flavors were spot on.
Anyways, make it you must.
I think I was channeling Yoda just then. Crazy delicious pizza will scramble your mind like that.
Perfect Potato Pizza
For the dough:
1 cup flour
1/2 packet of yeast
1/2 cup warm water
pinch salt
pinch sugar
For the pizza toppings:
1 cooked medium yellow potato (I cooked mine in plastic for 4 min. in the microwave)
3 pieces of precooked bacon
grated parmesan
shredded parmesan
feta cheese
herb mix
garlic salt
Stir together your flour and salt. In a separate container (I used a measuring cup) mix warm water, sugar and yeast. Mix all the dough ingredients together and let it sit in a bowl sprayed with non-stick spray for about 30 minutes. It won't rise much.
After your cooked potato is cool enough to handle, slice it into thin discs. Cut or tear your bacon into pieces.
Roll out your dough or just kind of stretch it and pat it with your hands onto your sprayed baking sheet.
Top with grated parmesan, sliced potatoes, salt, herb mix, bacon, shredded parm and feta.
Cook at 500 degrees for 12 minutes.
This recipe makes one medium sized pizza that would feed 2 hungry people. Double it if you want to make 2 pizzas.
Seriously good.
I had to pair my pizza slices with a salad to justify the carb on carb action going on with this pizza.
Friday, October 21, 2011
Painting a Proper Pumpkin
I don’t really go nuts over Halloween. I know that saying I don’t like Halloween is like saying I don’t like puppies. Remember the Friends’ episode where Chandler doesn’t like puppies? That’s insane. I love puppies, but Halloween-eh. I don’t have children, so I guess I have no reason to get into it.
Well, we moved into our new neighborhood where everyone has dangling skeletons, inflatable characters and pumpkins galore adorning their yards and houses. Um. Feeling a little left out. So I got a pumpkin. Yeah, just one. It’s kind of sparse, but at least we are not anti-Halloween.
I also bought some candy in case we get some trick-or-treaters. Yeah, it’s Dum Dums and Smarties (the cheap, lame candy), but at least I’m not handing out canned goods or something.
Ok, so back to the pumpkin. I have seen a few monogrammed pumpkins around the web and thought I’d make one, too. That way I don’t have to use sharp objects or touch pulp. And our pumpkin can sit out until Thanksgiving. It’s a win win, really.
Here’s how I did it.
First, I washed my pumpkin. It was filthy. Then I gathered my supplies:
A monogrammed letter of your last name (I found a celtic L on a Google Image search)
Contact paper
A marker
X-acto knife
Something to cut your stencil on (like a cutting mat or cardboard)
Paint (not pictured)—I used black spray paint. You could also hand paint with acrylic if you want.
Trace your letter on the contact paper then cut out. I meant to cut the outline out (so the letter would be painted, not the surrounding area), but I cut the letter out so I went with it and made a circle to go around it.
Ok, at this point I realized that you have to do the letter backwards if you are tracing it with the side of the contact paper with the writing on it. Head slap! Ok, I cut the letter out again. Whatever. Backwards this time.
Then carefully peel off the paper and adhere the contact paper stencil to your pumpkin.
Can you see that? No? Well, it is clear contact paper, so you know…
I spray painted this outside in a box because I am really bad about spray painting other surfaces (ask me about my aqua carport!).
Try to let it dry for like an hour.
I can’t wait!
Let’s see it together:
Oh, well, it got a little drippy.
If you are heavy handed with the spray paint like I apparently am, some nail polish remover and q-tips will do the trick.
There.
All better.
Oh, I just love it. I can feel myself getting in the Halloween spirit ;)
Fabulous Fall Fridays: Rosemary Roast Chicken
Brrr!! Fall has definitely arrived in our ‘hood. Time to bust out an old Fall favorite: roast chicken. Really, roast chicken is good any time of year, but I love to make it when it gets cooler outside so it fills the house with warm, comforting smells.
It might sound intimidating to roast a chicken, but really it is not hard at all. The hardest part is talking yourself into putting your hand in a chicken butt. Enter the Ziploc baggie:
Ok, here’s your ingredients. Let’s get started.
Renee’s Super Easy Rosemary Roast Chicken
3-4 lb whole chicken
½ a lemon
Head of garlic
½ onion (oops-not pictured)
4-5 sprigs of rosemary
4 tbsp butter
Salt + pepper
Ok, unwrap your bird and rinse it in the sink. Stick your hand in (with baggie on your hand if you want) and pull out the package of grossness and discard. Go to your happy place while doing this. It only takes a minute. Go ahead and rinse in there while you are at it. Pat the chicken dry with some paper towels.
Now put some butter, salt and pepper under the skin and a bit on top of the skin also. Shove your rosemary (or whatever herb you want to use), lemon, garlic and onion up the rump. Ok, you’re pretty much done in there.
Put the prepped bird in a roasting pan and surround with whatever veggies you like. I just used potatoes, carrots and onion. Season your veggies and toss in some herb sprigs for extra flavor.
Now, if anyone were ever to buy me a roasting pan, it would probably not get much use in the kitchen. I don’t want one. I buy disposable ones because I want to throw them away and not wash them (plus, they are only like a buck). I know it is totally not “green” but I know if I had a roasting pan to wash, it would just sit on the counter and would not get washed until my mom happened to visit.
Roast at 400 degrees for about an hour and 15 minutes or until juices run clear (internal temperature of 180 F).
Yum yum! You should make this for someone you want to impress. Or just for yourself. The leftovers make great sandwiches!
Um, on an completely unrelated note: Have you seen this blog?
http://ryangoslingdisneylandcats.tumblr.com
So hilarious! Features pictures of Ryan Gosling at Disneyworld with cats. For some reason I find this amusing. Here’s one of my favorites:
Have a great weekend, everyone!
Wednesday, October 19, 2011
Gift Idea Wednesdays: Spice It Up
I love spice blends. My favorite blend is Famous Dave's Steak and Burger seasoning (mentioned here). I looked at the back of this jar the other day and realized how many preservatives go into those seasoning blends. So, I am making my own.
These would make a great gift for friends, family or neighbors. It would be good to include in a gift basket, also. I made a grilling gift basket for my dad this past Father's Day and it actually included the Dave's seasoning. Now that I know how quick and easy it is to make my own, that is what I will be doing from now on.
Steak and Burger Spice Rub
Adapted from CDK Kitchen
3/4 cup paprika
1/4 cup ground black pepper
1/4 cup salt
3 tablespoons granulated sugar
2 tablespoons chili powder
2 tablespoons garlic powder
2 tablespoons onion powder
2 teaspoons cayenne pepper
Toss it all in a bowl. Admire the pretty colors
Whisk it together.
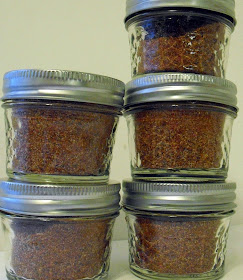
You are done. Add it to your jars or whatever. I used half pint canning jars and it filled 5.
Oh, by the way, I made some printable labels for you.
5 minutes of work and now I have gifts for 5 neighbors or friends :)
Oops! Forgot to tell you: Only 66 days until Christmas!!