Pages

Wednesday, August 31, 2011

Crazy Bread for Two


Pasta and bread are like peas and carrots. Except more delicious. And carb-ier.

We always (yes, always) have to have bread with our pasta. I usually have the frozen, light garlic Texas toast in the freezer in case a pasta mood should come about. But, the store I went to last did not have it, so I had to improvise.

This recipe makes the perfect amount for two adults (3 breadsticks for my husband and 2 for me). If you have a family of four, you can easily double it.

The texture is similar to Little Caesar's crazy bread, but better, I think. Sometimes when you get their crazy bread it is underdone and pale. These are golden and perfectly bread-y.

Crazy Bread for Two

1 cup all purpose flour
1 Tbsp yeast
1/2 cup warm water
1/2 Tbsp sugar
1/4 Tbsp salt
1 Tbsp olive oil
Garlic salt
Sea salt
Parmesan cheese (grated or shredded)
Italian herbs (optional)

Mix flour, yeast, water, sugar and salt in a medium sized bowl. Kind of knead it around for a minute until it is a good looking dough ball. Pick up the ball and spray oil or oil the bowl (so that when you take it out of the bowl it doesn't stick) and put the ball back in there. Cover loosely with plastic wrap or a towel and let rise for 30 minutes or so (I left mine for like an hour and a half because I went to exercise class and it was fine).
Preheat oven to 375 degrees and either oil your pan or use parchment paper (that's what I did) & either roll or stretch the dough out to about 1/4-1/2 inch thickness on the pan and brush with olive oil & sprinkle on your garlic salt, salt & parmesan (and herbs if using). Use pizza cutter or knife to mark the width of your breadsticks and bake for 16 minutes.

Recipe adapted from See Jane in the Kitchen

Oh, they were so lovely.


We enjoyed our crazy breadsticks with whole wheat pasta with lemon chicken and veggies. Yum.


These would be really stellar as dessert breadsticks, too, just replace the garlic salt, salt & parmesan (and herbs) with cinnamon sugar and make a quick glaze while they are in the oven. I kind of want to go home and make these now!

Monday, August 29, 2011

Making Gifts: Chalkboard Coasters


My husband and I have always been pretty conservative with our spending. We do not eat out much or spend a whole lot of money on frivolous things. It is just how we are.

Well, we are buying our first house, so I’m feeling especially careful about spending.

I tend to make gifts for people’s birthdays and Christmas gifts. It is a great way to save money.

Here’s a cute idea to make someone for a housewarming or a small Christmas gift.

Chalkboard Coasters

Chalkboard paint (small container is about 9 bucks at Wal-mart)
Tiles (you can get these at Home Depot, but we got a box at an estate sale)
Little felt pieces for the bottoms
Chalk

Paint your tiles with chalkboard paint. I did 2 coats of paint. After it dries, put your felt “feet” on the bottoms to keep the coasters from scratching furniture and whatnot. Have fun labeling your coasters, writing messages and making pictures.


My mom found a desk for my nephew and we painted the top of it with chalkboard paint. How fun is that? He can doodle on it or practice his letters. Cool.


I will definitely have more chalkboard crafts coming up! Gotta get my 9 bucks worth, right?

Saturday, August 27, 2011

My Favorite Chocolate Chip Cookies


This recipe has been my “go to”chocolate chip cookie for the past 2 years. I saw the episode of America’s Test Kitchen when they made these and I was intrigued.

It’s all about science and what not, which I know very little about. But when I make these cookies, people think I’m a genius. I let them think that.

The only problem with making these “perfect” cookies is that all my other cookies pale in comparison. Whenever anyone in the family has a birthday, I ask, “Can I make you a cake for your birthday?” They say to me, “No, I want those cookies.” Seriously people, sometimes I want to make a cake! Ok, not really. Cake decorating is harder than it looks. I’ll just stick with the cookies.


Today is our final walkthrough of our first house before we close next week & I made cookies for the sellers and our agents (as my husband would say, “nerd alert!”).

Here’s the recipe. You should make these. They will become everyone’s favorite thing you make. They will be talked about for years to come.

Perfect Chocolate Chip Cookies (from Cook’s Illustrated May/June 2009)

1¾ cups unbleached all-purpose flour
½ teaspoon baking soda
14 tablespoons (1¾ sticks) unsalted butter
½ cup granulated sugar
¾ cup packed dark brown sugar
1 teaspoon table salt
2 teaspoons vanilla extract
1 large egg
1 large egg yolk
1¼ cups semisweet chocolate chips or chunks

1. Adjust oven rack to middle position and heat oven to 375 degrees. Line 2 large baking sheets with parchment paper. Whisk flour and baking soda together in medium bowl; set aside.
2. Heat 10 tablespoons butter in 10-inch skillet over medium-high heat until melted, about 2 minutes. Continue cooking, swirling pan constantly until butter is dark golden brown and has nutty aroma, 1 to 3 minutes. Remove skillet from heat and, using heatproof spatula, transfer browned butter to large heatproof bowl. Stir remaining 4 tablespoons butter into hot butter until completely melted.
3. Add both sugars, salt and vanilla to bowl with butter and whisk until fully incorporated. Add egg and yolk and whisk until mixture is smooth with no sugar lumps remaining, about 30 seconds. Let mixture stand for 3 minutes, then whish for 30 seconds. Repeat process of resting and whisking 2 more times until mixture is thick, smooth and shiny. Using rubber spatula or wooden spoon, stir in flour mixture until just combined, about 1 minute. Stir in chocolate chips, giving dough final stir to ensure no flour pockets remain.
4. Divide dough into 16 portions, each about 3 tablespoons (or use a #24 cookie scoop). Arrange 2 inches apart on prepared baking sheets, 8 dough balls per sheet.
5. Bake cookies 1 tray at a time until cookies are golden brown and still puffy, and edges have begun to set but centers are still soft, 10-14 minutes, rotating baking sheet halfway through baking. Transfer baking sheet to wire rack; cool cookies completely before serving.

I actually used a cheap margarine this time, so the texture of the cookies was off, but they were still pretty great.


All packed up and ready to go.


Wednesday, August 24, 2011

Friendship Bread: Take 2


So, this is my second adventure with the friendship bread starter. See this post for info on the starter or this one for adventure 1.

The first time I made a sweet version of the bread, because all of the recipes seem to be for sweet versions. Mine was chocolate. I thought it was weird. I did not feel comfortable with the sweetness mixed with the yeast-y taste. It was not my thing. So I thought I'd turn my next starter into a savory version with ham and cheese.
Assuming you have a starter, here is the recipe below for directions to follow.

If anyone wants a starter, I have 3 that I popped in the freezer last night. Email me if you want one and I'll mail it to you (provided you don't live out of the country). Email myrtle918@yahoo.com.


Day 10: Follow the directions below:

Pour the entire bag into a nonmetal bowl.
Add 1 1/2 cup flour, 1 1/2 cup sugar, 1 1/2 cup milk.
Measure out 4 separate batters of 1 cup each into 4 1-gallon Ziploc bags.
Keep one of the bags fr yourself, and give the other bags to 3 friendship along with the recipe.
REMEMBER: If you keep a starter for yourself, you will be baking in 10 days. The bread is very good and makes a great gift. Only the Amish know how to make a starter, so if you give all the bags away, you will have to wait for someone to give you a starter back.

Should this recipe not be passed onto a friend on the first day, make sure to tell them which day it is when you present it to them.
_________________________________


Garlic, Parmesan and Ham Savory Bread

3 eggs
1 stick of melted butter
1/2 cup milk
1 1/2 tsp baking powder
1/2 tsp salt
1/2 tsp baking soda
2 cups flour
1 cup shredded parmesan cheese (and some for sprinkling on the top-optional)
1 clove garlic, minced
3/4 cup chopped ham

Preheat oven to 325 degrees.
Grease 2 loaf pans (I used one big loaf pan).
Mix up your ingredients along with your starter and pour in your pan(s).
Bake for one hour and 15 minutes or until the bread loosens evenly from the sides and a toothpick inserted in the center of the bread comes out clean.

Recipe adapted from: http://p-art-y.blogspot.com/2010/03/my-version-of-amish-friendship-bread.html

This turned out pretty yummy. Kind of tastes like beer bread, with yeasty and sort of sweet undertones and a dense crumb.

I tried to get a good picture of a slice, but it wasn't happening. You can get the idea from this blurry pic, I think:


The bread is good on its own, but I had mine topped with an over easy egg for breakfast. Holy yum, it was good!


Tuesday, August 23, 2011

Overnight Oats in a Jar


Don't you hate throwing away the jar of peanut butter? Well, don't do it—make this instead. It is a great way to get the last of your peanut butter out of the jar (without having to stick your face or hands in it).

We all know of my love for breakfast. I made my breakfast for today last night, which I'm pretty sure I've never done before.

Enter overnight oats in a jar.

I read a few healthy living blogs, and all those healthy-fied girls rave about oats in a jar. I don’t know why it took me so long to try them (as I go through lots of jars of peanut butter), but I’m glad I tried them today.

Here’s what you need


1/2 c oats (I used old fashioned, but you can also use quick cooking)
3/4-1 c milk (I used almond, and I also used a full cup)
Dash of cinnamon
Drizzle of honey (about 1/2 tbsp)
Empty peanut butter jar (or almond butter)

Put all these ingredients in the jar, shake it up with the top on (or stir it) and store in the fridge for at least 4 hours. I made mine at 9 p.m. last night and left them in there until 7 this morning. They were awesome!

You can either eat them straight out of the fridge or microwave them. I ate the oats cold and really enjoyed the experience. The honey added just enough sweetness and the cinnamon really went well with the peanut butter. The oats were just the right amount of tender, but still had a slight bite to them.

You can play with this recipe a bit. I looked at probably 5 or 6 different recipes out there and modified it to me. Bananas would be great in this, as would canned pumpkin (perfect for Fall). Next time you have an empty jar of PB, give it a try.


On a completely random and unrelated note—is it mushroom season or something? There are mushrooms popping up overnight all over the grounds of our apartment complex. So far, I’m the only dork crouched outside with a camera! But mushrooms are so cool looking. They look like cartoon characters or something. So as not to waste my nerdy pictures, I’ll share some with you today:


Saturday, August 20, 2011

How To Sew A Yoga Mat Bag


I am far from a seamstress. I do own a sewing machine, yes. And I attempt projects on it. Unfortunately I have no patience for sewing and cannot sew a straight line to save my life. Seriously.
Well, I am doing my first (and probably last) sewing tutorial to show you how easy it is to do this simple project.
I did not take measurements. It is not my way. So follow along as best as you can + think about making your own yoga mat bag.

What you need:
Some fabric (maybe a yard, just to be safe)
Strap (or make your own strap)
Scissors
Pins
Sewing machine
Drawstring (or elastic, if you are lazy like me)

I've broken the steps down into 4 main steps with pictures.

Step 1:
Lay your fabric out and put your yoga mat (loosely rolled) on top of it. Wrap the fabric around giving yourself about 1-2 inches of extra fabric. Trim your fabric.
Turn your fabric inside out around your yoga mat (picture C) and pin. You will sew across pinned line and you have your tube, which is the main part of your bag. Don't sew yet! You are going to have to pin your strap in (step 2).
Make sure when you cut the fabric that you leave 1-2 inches of extra fabric all around. I am pulling the mat out of the tube to sew on picture C--I did not make my tube too short!


Step 2:
This is where you decide how long you want your strap to be. I pinned mine in picture B, then slung it over my shoulder and it felt about right. Oh, this strap is nylon corded strap from Hobby Lobby (99 cents a yard)--it's by the ribbon in the fabric section.
You will need to unpin the strap from the inside out bag the way I have it in picture B and put it through, so that it faces the bag right side out. (I hope that makes sense.) See picture C for how it should look. Ok, turn your bag inside out again and sew the pinned line, including the straps.


Step 3:
Stand your rolled yoga mat up on the fabric and cut the circle for the bottom of the bag. What I did (sorry, no pics of this) is laid a bowl down a little bigger than the mat (again, giving myself 1-2 inches of extra fabric to work with), so I had a perfect circle. Cut it out. Pin to the bottom of the tube and sew.


Step 4:
This might get a little tricky to explain if you have never done a drawstring or elastic, so stick with me. After I sewed the bottom of the bag, I turned the bag right side out and put the mat in there. Then I folded the top of the fabric inward to where I wanted the elastic to be (pic A) and pinned it. Then I turned it back inside out and laid my elastic down. You will sew a casing for your elastic/drawstring that needs to be large enought to fit the elastic drawstring. Then I pinned under the elastic and sewed it, leaving a small opening to pull my elastic through. Take your elastic and pin a safety pin on the end and carefully thread through (don't lose the elastic/drawstring in there). Once the elastic/drawstring is pulled through and both ends meet, sew the elastic (if you have a drawstring, I guess you just leave it long and hanging out) and close the part of the fabric you left open.


That's it! A super easy yoga mat bag to impress your friends.
Mine is a little wonky, but handmade is so special, people will overlook the quirks.


Friday, August 19, 2011

Short Stack of Fluffy Yogurt Pancakes


I am very much a breakfast person. When people say, "Oh, I just don't eat breakfast," I don't get that. How can you not eat breakfast? I wake up and one of my first thoughts in my mind is what's for breakfast?

I like breakfast foods, too. I could eat breakfast for every meal, but then people would probably think I'm more nuts than I am. So I made a quick short stack of pancakes for breakfast this morning. My other meals today will be totally normal and non-breakfasty, I promise.

I got the recipe for these yogurt pancakes on food.com and it is it has a neat feature where you can modify it to make whatever serving you need/want. I made 1 serving, which is 3 pancakes. Oh, and these are pretty healthy for you and stuff.

Here's what you need:


1/2 cup flour
1/4 tsp salt
1/2 tsp baking powder
1/2 tbsp butter
1/2 cup yogurt (I used plain Greek yogurt, but flavored yogurt would rock)
1/4 cup milk (I used almond milk)
1/2 beaten egg (or use an egg white)

Melt butter for a few seconds in the microwave, mix in other wet ingredients. Mix flour, salt and baking powder and add to wet ingredients until combined. I used a 1/3 c measuring cup to plop my pancakes in the pan. Do it however you want. Oh, by the way. I need a griddle. It would be so much easier to flip pancakes on a griddle. If you have one, use it. Flip the pancakes when edges are bubbly and you peek under the pancake and see a golden color.

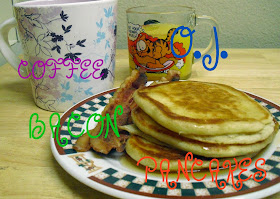
Enjoy with whatever sides you choose. Here's what I had:


Don't judge my non-matching dishes. I'm cool with it.

Thursday, August 18, 2011

Watermelon Lemonade Slush


Although kids are going back to school, it still feels like Summer (well, I guess it technically is Summer). Currently it is like a steam room outside. Sometimes you just need a refreshing beverage to get the motivation to step outdoors. I have a giant Ziploc bag stretched to the seams with cubed watermelon. This quick drink is a fun way to use some of that leftover watermelon.

This is what you need:


3 big handfuls of ice
1-1 1/2 tsp from KoolAid lemonade packet (oh, yeah)
3/4 cup cubed watermelon
Splash of Sprite Zero (optional, but my blender needs a little liquid to blend)
Splenda or sugar to taste

I have this book that I found while packing up the bookshelf on frozen drinks and it suggested taking your ice out of the freezer and sitting it at room temperature for about 10 minutes. This makes it easier to blend and does not leave behind ice chunks in your drink.

After your ice has set, toss the rest of the stuff in the blender & blend. This makes one large drink.

Some other ingenious additions to this drink would be fresh mint leaves or clear liquors like rum or vodka.

Mmm, frothy and refreshing

Tuesday, August 16, 2011

A Safe Amount of Cookies


I don’t know about you, but sometimes I just need a cookie. It is a biological need. I swear.

I like a fresh cookie out of the oven, but sometimes I don’t want to make a whole slew of cookies. Most cookie recipes make 2 dozen or so. I do have a recipe that makes a dozen, but a dozen cookies hanging around the house does not seem like the best plan of action. 12 cookies do not look good on my waistline. 4 cookies seem more manageable. I found this recipe yesterday from Bakergirl and knew what I had to do.

4 Cookies

1/4 cup + 1 tablespoon flour
1/8 teaspoon baking soda
A pinch of salt
2 tablespoons Smart Butter
3 tablespoons brown sugar
1 tablespoon beaten egg
1/4 teaspoon vanilla extract
1 regular sized package of M+Ms (or use 1/4 cup of any add in you like)

Preheat the oven to 350°F.

Mix together the butter and brown sugar. Add the tablespoon of beaten egg and vanilla and mix until combined. Add the flour, baking soda and salt and mix until just combined. Stir in the M+Ms.

Roll dough into four cookie balls (or use your cookie scoop) and place them on a lightly greased cookie sheet. Bake for 12-15 minutes.

These cookies were all at once chewy, fluffy and crispy. They really hit the spot. You should make them.


Oh, just so you know, I ate one cookie (not all four!) and gave the remaining 3 to my husband.


Monday, August 15, 2011

New Obsession & DIY Ombre Nails

Ok, I have heard other bloggers talk about Pinterest & wondered what the big deal was. Um, it’s awesome. That’s the big deal. It has eye candy of all sorts. Such pretty things to look at. I like to look at the home décor, the DIY projects and especially the prints. I love quotes and sayings and found such great things there.
They have the aspirational

The positive

The hilarious

The true


Anyway, it is a super fun time suck if you are into that sort of thing. Website is http://pinterest.com/ for those interested.

Well, the topic of this post is related to the endless amount of time I just spent on this site. I was looking for nail inspiration. As in, finger nails (or toenails).

I am currently packing up our stuff for our move next month (Does packing 4 boxes count as packing? Whatever) & found that I have a ton of nail polish.


Eek. Not sure how that happened. I don’t really paint my finger nails too much because they chip so quickly on me. Maybe because I wash my hands a lot and do stupid dishes every day. Well, it is nice to enjoy pretty nails on the cheap, even if just for a short amount of time.

So, here’s what I used to make my ombre nails:

*One nail color you like a lot (I used Dream On by Sinful Colors, it looks pink in the pic, but it is purple)
*White polish (I used Sally Hanson)
*Top coat
*Plastic container to mix colors (I used an old thumbtack container) & stirring stick
You can either start with dots of your color and add white, or do what I did and add white first. I started with 3 drops of white and worked my way up

Then added one drop of color

Then adjusted the drops so you could tell the difference between one shade to the next

I started with pinkie fingers and painted dark to light.
Here’s the results:

Ok, please ignore the fact that I painted more cuticle than nail. That’s just how I roll. I’m sure if you attempt this, you will do a neater job.